タグ: ServerProtect

ServerProtectに必要な32ビットライブラリのインストール

64bit版のCentOS6でServerProtectをインストールしようとすると

# /root/SProtectLinux-3.0.bin -s -S ********
Installing ServerProtect for Linux:
Unpacking...
Installing rpm file...
エラー: 依存性の欠如:
libz.so.1 は SProtectLinux-3.0-1362.x86_64 に必要とされています
libuuid.so.1 は SProtectLinux-3.0-1362.x86_64 に必要とされています

ということで、ストップします。

http://esupport.trendmicro.com/solution/ja-jp/1302795.aspx
この辺りで、32ビット版のライブラリが必要ということがわかるので、これらをインストール。
でも32ビット版ってどうやって指定するのかな?

ぐぐってみると、それぞれのライブラリの後ろに「i686」をつけて、32ビット版ということを明示してあげると吉らしい。

yum install zlib.i686 libuuid.i686

これでいいかな?いいみたい。
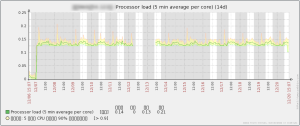
ServerProtect がコア1つ占有してる

ひっさびさにzabbix見てみたら、プロセスの占有率こんなだったっけ?
と、ふと気になったので過去にさかのぼってみた。

zabbix_graph

2週間前からコア1つぐらい100%で動いてる?
別の案件にかまけてて気付かなかった。

これやってるの誰?ということで、topで見てみると「splxmain」が100%で稼働中、コア1つを占有してた。
そんな事をもろともせずに普段通り仕事をこなしてくれたxeonに感謝しつつ、この splxmain を調べる。
あー。ServerProtect for Linux、君だ。
特に2週間前になにかやったこともないし、他の業務に支障はなさそうだったが、
ServerProtectの本来の業務が出来ていない気がしたので、リスタートをかけることにする。

# pstree -p | grep splxmain
|-crond(1640)—crond(31952)—sh(31953)—splxmain(31954)—splxmain(31961)

で、splxmain のPIDを見つけ出す。
今回は 31954 と 31961 なので

# kill -9 31954 31961

で、強制終了。
load average がみるみる減っていく・・・
このままだとServerProtectがいないままなので

# /etc/init.d/splx restart

で、リスタート。
無事、再起動完了。

ServerProtect for Linux 3.0 初期設定

http://[サーバIPアドレス]:14942/

で設定画面に入ります。
インストール直後のログインパスワードはないので空欄のままログインします。

[Administration] > [Password]
新規パスワードを設定します。パスワードの確認まで入力して[Save]。

[Administration] > [Proxy Settings]
外部に出る際にプロキシサーバを経由しているなら設定が必要です。
「General」タブでプロキシサーバアドレスとポートを入力して[Save]。
「Component Update」タブでは「Same as General」を選択して[Save]。

[Administration] > [Control Manager Settings]
Control Manager Server を使用しないなら特に設定する項目はないです。

[Administration] > [Product Registration]
License: Full
Status: Activated
の2項目に問題なければ大丈夫な気がする。

[Administration] > [World Virus Tracking Program]
「世界のどこでVirusが発生しているよ」っていうことを表示してくれるらしい。
必要なければNoを選択しても問題ないです。

[Update] > [Manual Update]
下記の[Scheduled Update]が設定されていれば問題ないと思う。
あまりにかけ離れた日付の定義ファイルだったら[Update now]を押してアップデートします。

[Update] > [Scheduled Update]
[Enable Scheduled Update]にチェックが入っており、かつ[Repeat interval:]が2時間であれば問題なし。

[Scan Options] > [Manual Scan]
[Specified directories only:]でhomeディレクトリしかスキャンしない設定になっているので[All directories]に変更します。

このぐらいかな?

ServerProtect for Linux 3.0 インストール

たまたま入れる機会があったのでメモ。

まずはトレンドマイクロのダウンロードセンターからダウンロード。
CentOS6の場合は SPLX30-CentOS6.tgz という専用バージョンがあるのでそちらから。
それ以外の場合は splx30-lin-singlepack.tar.gz を。

どちらも解凍すると [ SProtectLinux-3.0.bin ] というファイルが出てくるのでこれを使います。

./SProtectLinux-3.0.bin -s -S ライセンスコード

bin ファイルを実行します。
※ [-s] オプションではじめの長い同意事項を飛ばすことが出来る。
※ [-S] オプションで途中入力のライセンスコードを事前につけておくことも出来る。
※ プロキシサーバに関するオプションを探してみたけど、なかった。

Installing ServerProtect for Linux:
Dependency failed:
        Please install compat-libstdc++ package

とか言われてしまったら、compat-libstdc++をインストールします。

yum install compat-libstdc++-296

必要なのは「compat-libstdc++-296」。
「compat-libstdc++-33」というコンポーネントもあるが、特に上位互換というわけではないらしい。入れても「compat-libstdc++-296」が必要だと言われる。
CentOS6専用版をインストールしようとすると「libstdc++-libc6.2-2.so.3」が必要と言われる場合があるが、これも「compat-libstdc++-296」に内包されている。

Do you wish to connect this SPLX server to Trend Micro Control Manager? (y/n) [y]

トレンドマイクロのControl Managerに接続するかということなので「y」で。

SPLX server name or IP address:

インストールするサーバのIPアドレスを入力します。

Do you wish to connect to Control Manager server using HTTPS? (y/n) [n]

HTTPS接続しないので「n」で。

Control Manager server name or IP address:

インストールするサーバのIPアドレスを入力します。

Control Manager server port [80]:

普通にhttp接続なので「80」で。

Do you access Control Manager through a proxy server? (y/n) [n]

Control Managerとの間にプロキシはあるか?とのことなので「n」で。

Please specify the name you would like to display on the Control Manager console [SPLX server name or IP address]:

インストールするサーバのIPアドレスを入力します。

Please specify a folder name for this product (for example: /SPLX) [New entity]:

インストール先のディレクトリ名を指定します。「/SPLX」で。

Is the above information correct? (y/n) [n]

今まで入れた情報が正しいかの確認。「y」で。「n」のまま進もうとすると2番に戻されます。

Activation Code:

はじめに[-S]オプションでライセンスコードをつけていない場合、ここでライセンスコードを聞かれます。ハイフンも含めて入力します。
間違えると

Activation unsuccessful.
The Activation Code you entered is invalid. Please try again.

と言われて、再入力になります。

Please input your choice [Yes] :

最後は「No」で。これでインストールが始まります。

Starting services...
Starting ServerProtect for Linux:
Checking configuration file:                               [  OK  ]
Starting splxcore:
Starting Entity:                                           [  OK  ]
Loading splx kernel module:                                [Not available]]

Error:   Kernel Hook Module (KHM) for this Linux kernel version is not
available. Check if the KHM for your  Linux kernel version is released
on the Trend Micro website at  "http://www.trendmicro.com/en/products/
file-server/sp-linux/use/kernel.htm".Or,follow the instructions in the
INSTALL file in "/opt/TrendMicro/SProtectLinux/SPLX.module/src/module"
to build the KHM for your Linux kernel version.

Starting vsapiapp:                                         [  OK  ]
ServerProtect for Linux core started.
                                                           [  OK  ]
Starting splxhttpd:
Starting splxhttpd:                                        [  OK  ]
ServerProtect for Linux httpd started.
                                                           [  OK  ]
ServerProtect for Linux started.

The virus notification program is not started. This program only starts in
K Desktop Environment (KDE). Start this program using the Quick Access
console in KDE.

ServerProtect for Linux installation completed.

でインストールは終了。

途中で「Ctrl-C」とかでインストール作業を中断すると、変にインストールされてますが状態になったりする。
その時は

#rpm -e SProtectLinux

で削除した風に戻す。

Shutting down ServerProtect for Linux:
Shutting down splxcore:
Shutting down vsapiapp                     [FAILED]
Unloading splx kernel module:              [FAILED]
Shutting down entity:                      [FAILED]
ServerProtect for Linux core not running.
                                           [FAILED]
Shutting down splxhttpd:
Shutting down splxhttpd:                   [FAILED]
ServerProtect for Linux httpd not running.
                                           [FAILED]
ServerProtect for Linux not running.

とまぁ、いい感じに怒られるがこれで再インストールできる。